How to Make Thanksgiving Table Centerpieces Using *Fall Fruits*
It’s no secret that Thanksgiving table centerpieces are the star of the show in every November tablescape. They command the attention of the room and set the tone for the occasion. If you’re hosting Thanksgiving dinner this year and need a super easy Thanksgiving table centerpiece idea, you’re in the right place.
This post contains affiliate links. We may earn a small commission when you purchase through links on our post, at no cost to you. We only recommend products we would use ourselves, and all opinions expressed below are our own.

Thanksgiving hosting comes with enough stressors (if you know, you know). The last thing you need to worry about is impressing your guests with a memorable Thanksgiving centerpiece.
There are way too many options to choose from, and not enough time to commit. On the one hand, you could go the traditional route with pumpkins, fall branches, and pillar candles. A classic. On the other hand, you could opt for a more straightforward approach with just a few taper candles lining the length of the table.
Let me make the choice easy for you. Instead of fake pumpkins and fall branches (we’ve all seen those before) let’s go all-natural. Here’s how you can create an elevated Thanksgiving table centerpiece even Martha Stewart would be proud of.
All you need is a variety of grapes, some taper candles, and maybe a few figs. If you’re ready to impress your guests with unforgettable Thanksgiving table centerpieces, stick around.

Thanksgiving Table Centerpieces: Shopping List
Out of all the Thanksgiving centerpiece ideas out there, this one is by far the easiest to shop for. All it takes is a quick trip to the grocery store! And we’re all practically living in the grocery store come November, right?
I’m also including a few Thanksgiving decor extras I added to my Thanksgiving table centerpiece at the last minute, but these are totally optional. The point here is to focus on the fall fruit and add any finishing touches you need after.
Shopping List
Produce Quantity
The amount of fruit you need depends on the size of your Thanksgiving table and the centerpiece look you’re going for.
Do you want a simple, understated Thanksgiving table centerpiece, or do you prefer a more exaggerated design that takes up more space?
If you choose the former, measure your dining table and buy just enough grapes to span the length of the table. If you want to take up more visual space, buy twice as many and layer them on top of each other.
As a reference point, my dining table is ninety inches long, and I went for a more abundant, exaggerated centerpiece design. I ended up buying six pounds of red grapes, four pounds of green grapes, 4 pounds of thomcord grapes, two pounds of champagne grapes, and one pound of figs from Trader Joe’s.

The total for everything came out to $47.90. Not bad for a centerpiece that doubles as dessert!
To add more height and volume to my centerpiece, I placed floral foam blocks at the base and layered the grapes and seasonal fruits on top. I bought a pack of six foam blocks for $9.99, which is the equivalent of around three pounds of grapes from Trader Joe’s. This is an easy way to make it look like you have more grapes than you do without hurting your wallet. It’s a win-win!
Shop Your Home
My best advice to reduce stress and spending this holiday season is to shop your home first. You’d be surprised how many decor pieces in your living room, dining room, and even bedroom you can reuse as Thanksgiving table decor.
That beautiful catch-all tray in the entrance of your house? Reuse it as a small serving platter. The candlesticks on your living room mantle? Include them in your Thanksgiving centerpiece. The flowers on your bedroom nightstand? Use them to create a fun seasonal arrangement, or break them up into smaller bud vases for your Thanksgiving table.
RELATED POST: 33+ Neutral Fall Decor Pieces That Complement Your Existing Furniture & Decor
Once you take inventory of your home, fill in the gaps with a fall shopping trip. I sound like a broken record when I say this, but I genuinely mean it. Taking stock of the items you have at home allows you to shop intentionally and appreciate the things you already have. What better way to embrace the meaning of Thanksgiving!

Thanksgiving Table Centerpieces: Stick to This Timeline
There are pros and cons to using natural fruit as the base of your Thanksgiving table centerpiece. The pros: they’re beautiful, multi-functional, and elegant. The cons: they go bad quickly.
This isn’t the type of centerpiece you set up in advance and check off your to-do list early. Natural Thanksgiving table centerpieces require a little bit of planning to maximize their beauty and taste.
RELATED POST: 15 Hosting Tips for a Successful Fall Dinner Party
Here’s the exact timeline I followed to ensure my all-natural Thanksgiving centerpiece stayed fresh for the big day, and lasted long enough after to eat and enjoy.
1 Week before thanksgiving
Grapes can stay fresh one to two weeks in the fridge, so I’d recommend buying your grapes anywhere between one to seven days before Thanksgiving. The closer to the big day, the better.

After purchasing, put your grapes directly in the fridge unwashed in their original packaging. This will ensure they stay as fresh as possible until it’s time to set up your centerpiece.
Day of Thanksgiving
I have good news and bad news. Let’s get the bad over with first. You need to hold off on decorating your Thanksgiving table until the day of.
For all my type A hosts out there, this is not ideal news. Trust me, I know. It would be so much easier to set up the table ahead of time, and just focus on cooking the day of Thanksgiving.
But here’s the good news. This Thanksgiving table decor is a breeze to set up. It only took me ten minutes start to finish. So the impact on your hosting duties should be minimal. But more on that in the next section.
After Thanksgiving
As Thanksgiving dinner comes to an end and there’s no more pumpkin pie to go around, it’s time to preserve your seasonal fruits. Place the grapes back in their original packaging and put them in the fridge. The sooner you do this, the better.
Remember, grapes only last one to two weeks in the fridge, and one to two days at room temperature. If you want to get the most out of your natural centerpiece, keep the grapes refrigerated as much as possible.

How to Set Up Your Thanksgiving Centerpiece
Let’s pretend it’s the morning of Thanksgiving. Your guests are on the way, the oven is preheating, and there’s no shortage of things to get done. Breathe, you got this.
Step 1: set your table linens
Before we start building the Thanksgiving centerpiece, place your tablecloth and table runner (if you plan on using them) on your dining table to set the foundation for your tablescape.
Step 2 (optional): add foam blocks for height
If you want your Thanksgiving table centerpiece to have more height and volume, add floral foam blocks across the length of your dining table. If the foam blocks shed, just place a paper towel under each to protect your linens.
Make sure you space them out so there are gaps between the blocks. This will create a natural-looking rise and fall that mimics the irregularities of nature.
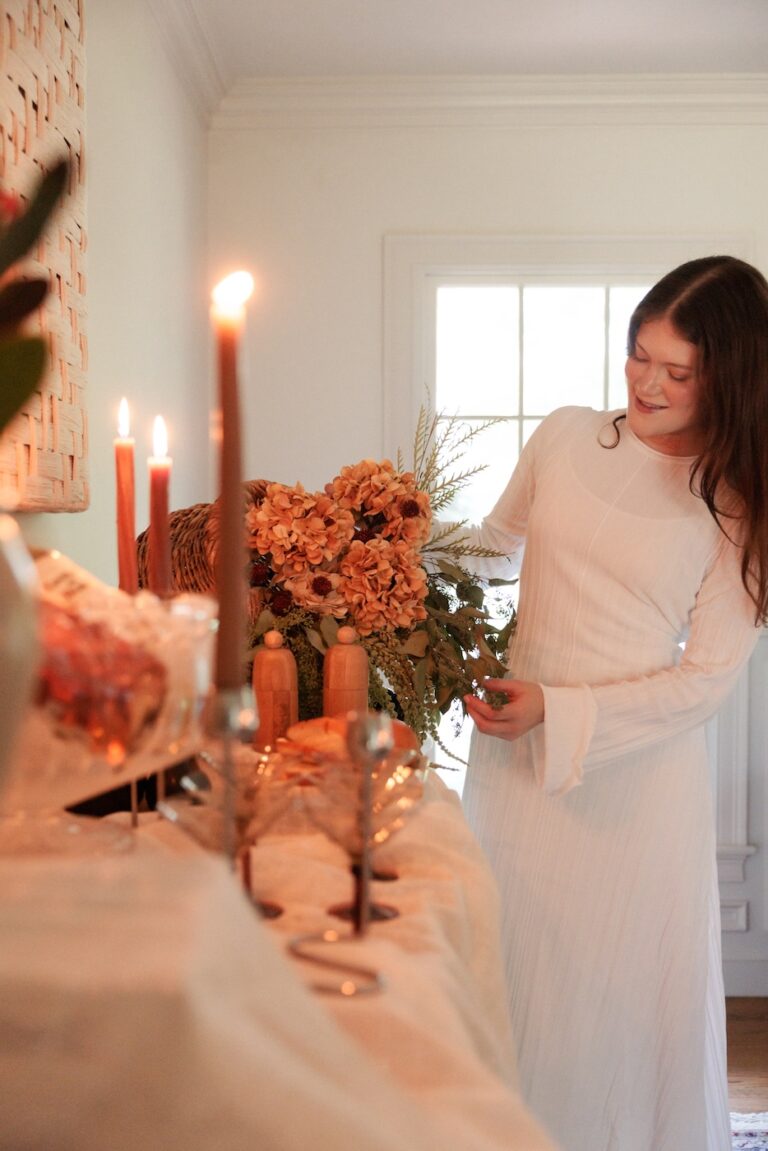
Step 3 (optional): Add taper candles
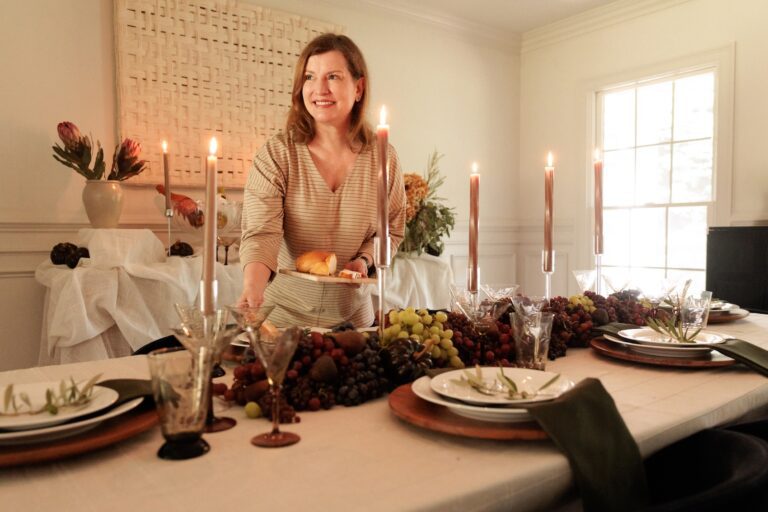
Taper candles are a nice-to-have, not a need-to-have. I wanted some extra height to break up the grapes, so I added glass taper candle holders between the foam blocks at varying heights. These brown taper candles matched the Thanksgiving centerpiece perfectly and added a natural touch to the tablescape. Highly recommend.

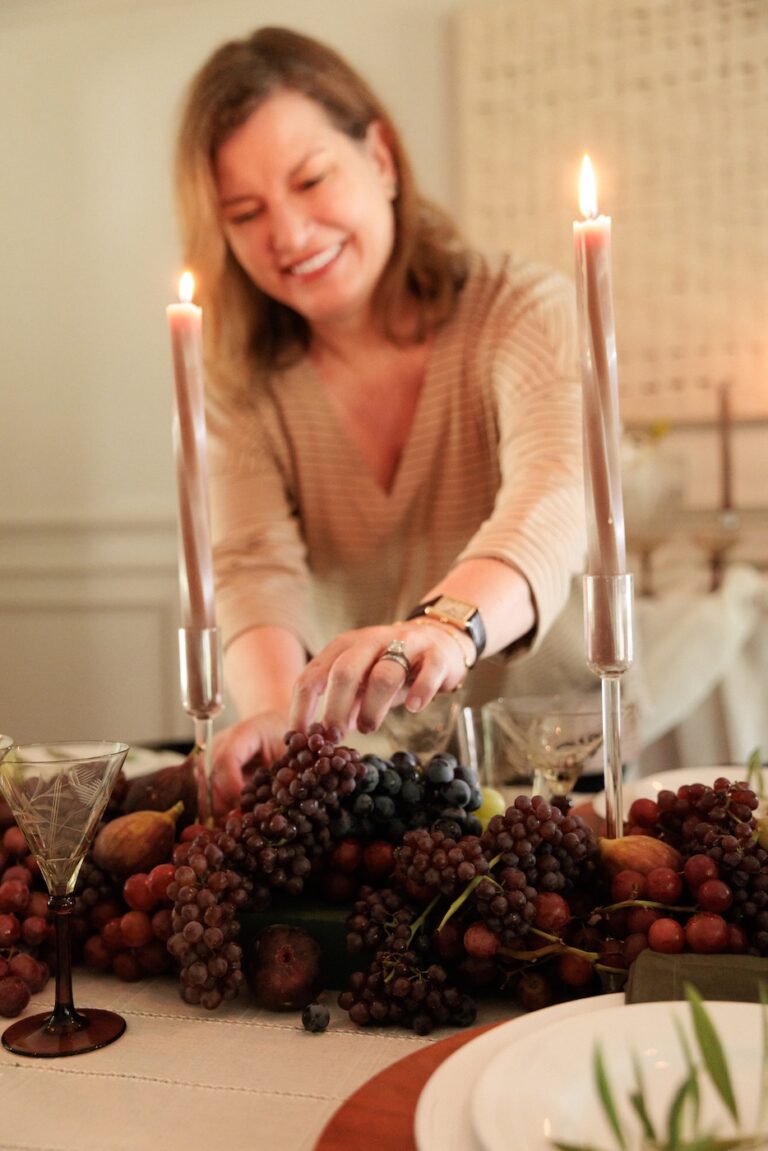
Step 4: Layer the Grapes
Open all of the grape containers and work with one type of grape at a time. Oh, and don’t throw out the grape packaging. You’re going to need them to store the grapes after dinner!
I started with the red grapes, placing clusters down randomly along the center of the table. Some of the clusters rested on top of the foam blocks, others cascaded down the sides, and the remaining were placed directly on the table between the blocks.
I repeated the same process with the green, thomcord, and champagne grapes, layering them randomly throughout the center of the table to create a natural look.
Pro Tip: Start with the bigger grapes first, then layer the smaller grapes on top (otherwise they might get squished!)
Step 5: Fill in the gaps
This is where the rest of your seasonal fruits come in handy. Use your figs, pears, apples, or oranges to fill in any gaps in the layered grapes. I used my figs to disguise the exposed foam blocks that weren’t fully covered by the grapes.
Such an easy fix. You wouldn’t even know that the blocks were under there.
Pro Tip: Cut some of your figs, apples, pears, and oranges in half to create a more dynamic look. Plus, the halves take up the same visual space, so you’ll end up using less fruit.

I recommend walking around your table and observing all sides of your centerpiece to make sure you addressed any missing pieces or empty spots. You want it to look good from all sides, since you’ll have guests sitting at every angle.
Once you’re ready to serve Thanksgiving dinner, light the taper candles and you’re good to go!
The Key to All-Natural Thanksgiving Centerpieces
This was my first year creating a Thanksgiving table centerpiece entirely out of fruit, and I have to say, I’m a fan. Not only did it look elevated and organic, but it was much easier to make than I thought. The key to executing an all-natural Thanksgiving centerpiece is knowing how to preserve your fruit.
Keep your produce in the fridge as long as possible, carve out ten minutes to set up your centerpiece the day of, and enjoy your masterpiece. You’ll be amazed at how beautiful your Thanksgiving table design looks with these natural touches.
If you try out this Thanksgiving table centerpiece diy, tag @gdhomedesigns in your content so we can celebrate the big reveal with you. Until next time, happy hosting!
This post is all about natural Thanksgiving table centerpieces you can recreate in your home.